マニュアルはこちら。
参考>> http://cloud.com/kb/cloudstack-21-documentation
Cloudstackの概要についてはこちら
参考>> Cloud.com CloudStack Community Edition 2.1 概要
注意
RedHat系の場合は、インストール時の依存関係解決が難しいので、必ずyumを使える環境にしておくとよい。
Table of Contents
=================
1 テスト環境
2 Management Server のインストール
2.1 MySQLの準備
2.2 Cloud.com リポジトリを追加
2.3 コンソールプロキシのインストール
2.4 Cloud.com マネージャのインストール
2.5 データベースの設定
2.6 マネージャの設定
3 Management Serverの設定
3.1 最初のZoneを作成
3.2 Pod を作成
3.3 Primary Storageを追加
3.4 コンソールプロキシの設定
4 Computing Node のインストール
4.1 yum リポジトリの追加
4.2 Computing Node 用エージェントのインストール
4.3 SELinuxを無効にする
4.4 Cloud.com エージェントの設定
1 テスト環境
^^^^^^^^^^^^^
以下のサーバ3台で試す。
Management Server:HP ML110G6 RHEL5.5 x64
Computing Node:HP ML110G6 RHEL5.5 x64
Storage: Sun Ultra 24 Solaris10/ZFS - NFS Server
ノードがもっとあるといいんだけど、自宅環境なのでこれだけでテスト。
2 Management Server のインストール
^^^^^^^^^^^^^^^^^^^^^^^^^^^^^^^^^^^
2.1 MySQLの準備
~~~~~~~~~~~~~~~~
# yum install mysql-server
/etc/my.cnf の編集...[mysqld] section に追記
-------------------
innodb_rollback_on_timeout=1
innodb_lock_wait_timeout=600
-------------------
自動起動設定
# service mysqld start
# chkconfig mysqld on
2.2 Cloud.com リポジトリを追加
~~~~~~~~~~~~~~~~~~~~~~~~~~~~~~~
# cd /etc/yum.repos.d/
# wget http://download.cloud.com/foss/centos/cloud.repo
# yum clean all
2.3 コンソールプロキシのインストール
~~~~~~~~~~~~~~~~~~~~~~~~~~~~~~~~~~~~~
# yum install cloud-console-proxy
2.4 Cloud.com マネージャのインストール
~~~~~~~~~~~~~~~~~~~~~~~~~~~~~~~~~~~~~~~
# yum install cloud-client
2.5 データベースの設定
~~~~~~~~~~~~~~~~~~~~~~~
# cloud-setup-databases cloud kvm --deploy-as=root
2.6 マネージャの設定
~~~~~~~~~~~~~~~~~~~~~
# cloud-setup-management
3 Management Serverの設定
^^^^^^^^^^^^^^^^^^^^^^^^^^
ここからの作業はブラウザで行う。
http://management_server_ip:8080/client
でアクセスすると以下のログイン画面が出てくるので、admin/passwordでログインする(デフォルトユーザ)

3.1 最初のZoneを作成
~~~~~~~~~~~~~~~~~~~~~
ログインしたら最初のZoneを作成する。
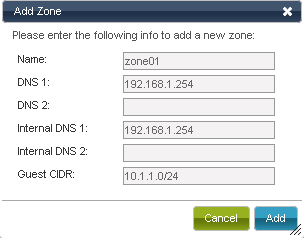
- Name: This can be anything to name the Zone.
- DNS 1 and 2: These are DNS servers for use by guest VMs in the Zone. These DNS servers will be accessed via the public network you will add later. The public IP addresses you provide for the Zone must have a route to the DNS server named here.
- Internal DNS 1 and 2: These are DNS servers for use by system VMs in the Zone. These DNS servers will be accessed via the private network interface of the System VMs. The private IP address you provide for the Pods must have a route to the DNS server named here.
- Guest CIDR: Editing this field is an advanced topic that will be discussed in follow-up documentation.
3.2 Pod を作成
~~~~~~~~~~~~~~~
Zoneの中にPodを作る。

- Gateway: This is the gateway in use for these IPs.
- Netmask: This is the netmask associated with this IP range.
- IP Range: This takes a lower and an upper IP address that together form a range. These IP addresses will be assigned directly to the guests via DHCP.
Podを作成すると、管理メニューが拡張され、できることが一気に増える。

3.3 Primary Storageを追加
~~~~~~~~~~~~~~~~~~~~~~~~~~

- Availability Zone: the Zone of the storage device
- Pod: the Pod of the storage device
- Name: a name to assist you in recognizing the storage device
- NFS Server: the DNS name or IP address of the NFS server
- Path: the exported path to the storage
- Tags: an optional comma-separated list of attributes of the storage device. For example, fast. Service and Disk offerings can have tags as well. A storage allocation succeeds only if there is primary storage that offers all of the tags on the service and disk offering.
3.4 コンソールプロキシの設定
~~~~~~~~~~~~~~~~~~~~~~~~~~~~~
# cloud-setup-console-proxy
4 Computing Node のインストール
^^^^^^^^^^^^^^^^^^^^^^^^^^^^^^^^
4.1 yum リポジトリの追加
~~~~~~~~~~~~~~~~~~~~~~~~~
# cd /etc/yum.repos.d/
# wget http://download.cloud.com/foss/centos/cloud.repo
# yum clean all
4.2 Computing Node 用エージェントのインストール
~~~~~~~~~~~~~~~~~~~~~~~~~~~~~~~~~~~~~~~~~~~~~~~~
# yum install cloud-agent
4.3 SELinuxを無効にする
~~~~~~~~~~~~~~~~~~~~~~~~
# setenforce permissive
# reboot
4.4 Cloud.com エージェントの設定
~~~~~~~~~~~~~~~~~~~~~~~~~~~~~~~~~
この設定は、途中でNICの設定を変更してネットワークに接続できなくなるので、必ずコンソールから行う。
# cloud-setup-agent
Management ServerのIPアドレスを聞かれるので入力する。
登録するときにコンピューティングノードでブリッジインターフェースが設定されていると、面倒なのでいったん解除しておいた方がよさそう。
成功すると、以下のように管理画面に表示される。

これで初期設定は完了。後の作業としては、
1. テンプレートの作成
2. Offeringの設定(課金単位)
3. 仮想マシンの作成
続く